How to Start an Open Source Project on GitHub (that people use)
This weekend my side project Jekyll Now hit 1,000 forks on GitHub! It’s being used by many to create blogs using GitHub Pages and Jekyll.
During the last few months of building Jekyll Now, I’ve learned that making something to fit my own needs was easy, but making an open source project that other hackers will benefit from, use, and contribute to is a lot tougher.
This post shares a number of the techniques that I used while working on Jekyll Now that will help you:
- Make something people want
- Make sure people “get” your project quickly
- Make it painless to install
- Get traffic from the right audiences
You don’t need to be John Resig, Paul Irish, or DHH to start an open source project. We’re all capable of building something that’s useful to people. This post is for all developers and I hope that it helps you start your next project.
1. Make something people want
As hackers we often think that our latest idea is awesome. And it is… to us. Coming up with an idea is a great start. If you want to work on something that others will use and contribute to, you should make sure that they’re as excited about it as you are, before investing a lot of time into something that only you want.
If you’re building a side project only to solve your own needs and don’t care about whether people use it or not, that’s awesome too… but not what this post is about.
Solve a pain point
One of the best ways to start something is to recognize your own pain points, especially the ones that others are likely to have. The bigger the pain point your project solves for people, the more likely they are to use it and benefit from it.
The motivation for creating Jekyll Now came from solving my own pain in setting up a Jekyll blog. I love blogging using Jekyll but thought it was way too difficult to set up initially—mostly due to needing to install ruby and other dependancies. I’d heard from a number of people that they’d love to set up a Jekyll blog but gave up at that hurdle.
Digging into things more I noticed that this was a pain point that the Jekyll team are exploring solutions for, too.
Validate that people will use your solution
Start out by building the simplest prototype possible to solve the pain point.
Focus on getting something in front of people fast. Quick and dirty code is best as you should expect that it may be completely thrown away. If your prototype is taking longer than a day or two to build you might be adding more complexity than you need. Take a step back and re-focus on solving the main pain point.
Your goal is not to build a finished product, it’s to build just enough to be able to tell if people will use it or not.
Find a few people who you think might suffer from the pain point that your project addresses and give them a go of your prototype. They might be friends, co-workers, or people in existing online communities. Ask what they think, see if they understand what your project is and how they might use it to help solve their problem.
Success = people USING your project
Positive feedback is not a reliable indicator of whether people will use your project. One way to spend a lot of time creating something that nobody wants is to ask people what they think, receive glowing positive feedback, and expect that they’ll actually use it. They probably won’t.
When you show people your project, they’re heavily biased towards telling you what you want to hear. Nobody wants to crush your dreams and tell you that your idea sucks and they wouldn’t use it. Instead they’re more likely to tell you that they love your idea and that they’d totally use it.
Be wary if people don’t use your project in the week or two after you’ve shown them it.
If people don’t start using your prototype or showing heavy interest in it, don’t be afraid to ditch it and start working on something different. Often the process of showing people your prototype may enlighten you on related pain points that you’d rather solve instead.
My friends and co-workers were the early adopters of Jekyll Now, including Jon Uy, who uses it to showcase his fantastic Android Apps!
2. Make sure people “get” your project quickly
Now that you’ve validated that people will use your project, you might have already created a public repository up on GitHub. You’ll be pointing people here to learn about your project so it’s important to make sure that when they arrive they’ll understand what it is and how it solves their problems.
If you don’t do this well, then people will bounce without understanding that your project could really help them, and you won’t know that that’s why they’re bouncing. It’s better to make sure people understand your repository early.
The ten second GitHub repository test
I used this quick test to conduct interviews with a few friends and workmates that hadn’t previously heard of my project:
- Create your project repository on GitHub, adding a description and readme
- Grab a friend that’s in your target audience for the project (but hasn’t seen it before) and open the repository on their screen
- Close it after 10 seconds so that they can’t see it any more
- Ask them what the project was about and why they might use it
If they understood the project and how it relates to their problems that’s great! Your descriptions did the job.
The benefits of Jekyll Now weren’t obvious to people
The key benefit of Jekyll Now is that you can create a Jekyll blog without leaving github.com, without needing to set up any local development. All you have to do is fork.
No matter how I described this in the readme, people just weren’t getting it. I also found out that they didn’t understand the difference between Jekyll Now and Octopress, or a standard Jekyll install.
I thought that the benefits of my project were obvious, but when I asked people they didn’t understand them at all.
If you also find that people aren’t fully understanding how you project can help them then it’s time to…
Go into more detail in your readme
I noticed that new visitors usually read the repository description, then jump straight to the top of the readme and look for additional information on the project. I updated this to provide more context on what Jekyll is and how Jekyll Now relates to it, then talked directly to the problem that it solves so that people can figure out if it’s relevant to them or not.

I then included a screenshot of what the project creates them, to give a quick demo to visitors who are scanning the repository.

Conduct a follow up round of testing
When I conducted the next round of informal tests, people got the project much more easily and were able to decide whether they were interested or not.
I think that this process is crucially important in the early stage of creating a project. You won’t be able to get this type of feedback when your repository is live on the internet. Instead, people will silently bounce and you’ll never know that they didn’t understand it.
A concise GitHub repository description helps people discover and share your project

A clear, concise message of what your project is helps people understand it quickly, and gives them something quick to copy + paste and share.
When your project is displayed on GitHub Explore, your GitHub profile, or is pasted into Twitter or HipChat, the description metadata gets displayed there. Providing a short description is helpful for people who don’t yet have any idea idea of what your project is.
Crafting your description
Boil your project down to the one thing that’s most important to people. The core problem that it solves.
Some examples:
- Picturefill: A responsive image polyfill for
<picture>, srcset, sizes, and more. - Bootstap: The most popular HTML, CSS, and JavaScript framework for developing responsive, mobile first projects on the web.
- TelescopeJS: An open-source social news app built with Meteor.
- Jekyll Now: Build a Jekyll blog in minutes, without touching the command line.
3. Make it painless to install
Now that people are jazzed about your project, and totally understand why it’s going to be great for them, they need to install it.
The easier your installation is, the more people are going to use and contribute to the project
Simplify your installation process as much as possible. A bulleted list of every step needed to install the project (and/or set up local development) is a must-have for your readme.

Watch other people attempting the installation process
It’s easy to ask a few friends to run through and install your project, and you might find points they struggle with that you weren’t aware of.
Running a workshop can also be a great way to test that the project is easy to set up and use. For Jekyll Now, I held a small Meetup to help get set up with Jekyll blogs so that I could see what their pain points were, making sure I had them covered in the readme.
Consider creating a gif illustrating tricky or non-standard installations
I began to notice that people struggled to understand how to set up their blog as they hadn’t seen a setup flow like this before. I decided to create a gif that illustrates the workflow using LiceCAP.

It only took me 15 minutes to create and add it to my readme.
4. Get traffic from the right audiences
The last step to starting your project is getting it in front of audiences that will love it. This one’s important for one big reason:
If people don’t ever find your project, they can’t possibly benefit from it.
Identify your audience and where it lives
Open a blank text file and list out ideas for the following things about people that you think would love your project:
- Websites that they read regularly
- Newsletters that they subscribe to
- People who they follow online
If you listed sites like Hacker News and Stack Overflow, drill deeper.
Hacker News is a wide audience. Only a small percentage of people who browse it might be in your target audience so it’ll be difficult to be surfaced there.

Subreddits are smaller, more specific audiences. They contain only people who are interested in jekyll, ruby, bash, or whatever your project is about. They’re a great example of somewhere more specific to start showing people your project. Just be sure to check the etiquette guidelines to the subreddit before you post to it, to make sure that it’s ok to self promote there.
Get your project in front of your audiences
Here are some of the places I shared Jekyll Now, with links showing their varying levels of success:
- A tutorial for Smashing Magazine on setting up Jekyll using Jekyll Now
- Subreddits: jekyll, coolgithubprojects, sideproject, webdev
- Hacker News
- Blog post on barryclark.co
- Posted up to jekyllthemes.org, and it’s still on my todo list to post to staticgen.com and staticsitegenerators.net
I’m sure there was more I could have done, too, but those were the places that I found when identifying my audiences.
Remember to talk about the pain point that you’re solving when speaking to your audiences. This is the compelling part to people!
My biggest traffic referral
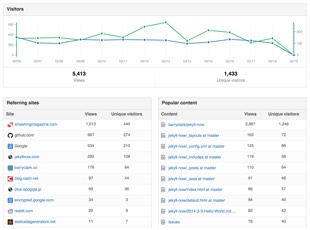
My tutorial for Smashing Magazine was the biggest driver of traffic to Jekyll Now, and is continuing to bring in more visitors (GitHub: latest Jekyll Now traffic graph).

The Smashing Mag post also generated a lot of sharing on Twitter, including a tweet from Jekyll creator Tom Perston-Werner himself!
Been meaning to try out Jekyll? Here's an awesome, in-depth evaluation and tutorial to help get you started: http://t.co/F3R1RgJW83
— Tom Preston-Werner (@mojombo) August 4, 2014Find out who’s using your project
Looking at what the first people are changing after they’ve forked your repository can give insight into potential features that might be in demand.
Keeping an eye on Twitter shares for your repository is a great way see who’s sharing, and to ask questions back to people on how they’re using the project.
@BazNYC Yep, teaching at Columbia College. Figured you’d notice the spike. 😉
It went great. Huge thanks for setting up that repo!
— Jon Petto (@ghostwheelie) September 9, 2014Conclusion
One of the most rewarding parts of starting an open source project for me has been seeing the use that people have gotten out of it. We’re all capable of building something that’s useful to people. I hope that the steps above are helpful in getting your project started.
A quick recap:
- Make something people want
- Make sure people “get” your project quickly
- Make it painless to install
- Share your project with the right audiences